If there’s a dessert that evokes joy, nostalgia, and big, cozy energy all at once, it’s the banana split. This classic treat — with its sweet bananas, creamy ice cream, chocolate sauce, and whipped cream — has been delighting taste buds for generations. But let’s face it: assembling a traditional banana split for a crowd can be messy, time-consuming, and sometimes impractical. That’s where the No-Bake Banana Split Cake comes in. It captures all the flavors of the classic banana split but transforms it into a creamy, layered, sliceable dessert that’s perfect for parties, potlucks, or simple indulgence at home.
In this post, we’ll explore not just the recipe but the history of the banana split, the science of no-bake desserts, tips for achieving perfect layers, and creative variations to make this dessert uniquely yours.
The Origins of the Banana Split
The banana split has a storied history dating back to the early 1900s. While multiple cities claim its invention, the most widely accepted story attributes the dessert to David Evans Strickler, a 23-year-old apprentice pharmacist in Latrobe, Pennsylvania, in 1904. Strickler created the banana split as a treat to sell at his soda fountain.
The classic banana split is composed of:
- A split banana
- Three scoops of ice cream (traditionally vanilla, chocolate, and strawberry)
- Toppings like chocolate syrup, pineapple, and strawberry sauce
- Whipped cream, chopped nuts, and a cherry on top
This combination of flavors — sweet, creamy, fruity, and crunchy — quickly became a beloved American tradition, especially for summer treats and celebrations.
By turning this concept into a no-bake cake, we preserve all the flavors and textures but in a form that’s easier to make, transport, and serve.
Why No-Bake Cakes Are Genius
No-bake cakes have become increasingly popular because they combine indulgence with convenience. Unlike traditional cakes that require baking, cooling, and precise timing, no-bake cakes often involve:
- Simple layering of ingredients
- Refrigeration to set instead of baking
- Less cleanup and lower risk of errors
This makes them ideal for home cooks who want impressive desserts without the stress. In the case of a banana split cake, the creamy layers of pudding and whipped topping pair perfectly with sliced bananas and a crunchy cookie or wafer base. Refrigeration allows the flavors to meld beautifully, resulting in a dessert that tastes sophisticated but requires minimal effort.
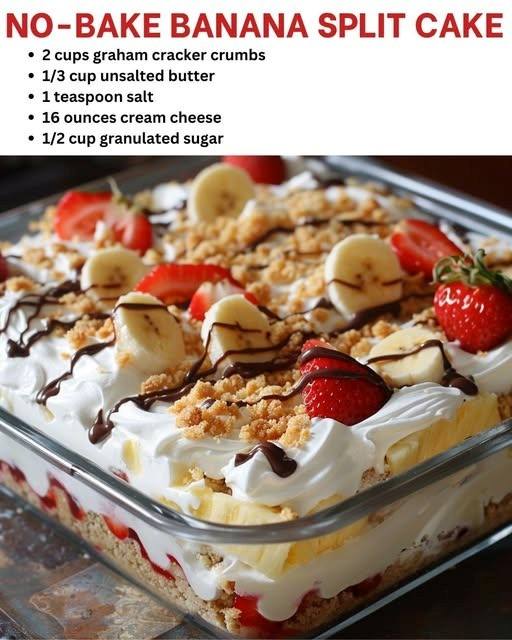
Ingredients for No-Bake Banana Split Cake
The beauty of this dessert is that it relies on simple, accessible ingredients, yet produces a cake that looks and tastes special. Here’s what you’ll need:
For the Base:
- Graham crackers or vanilla wafers: These create a sweet, sturdy crust for the pudding layers.
- Butter: Helps bind the base together.
For the Banana Layer:
- Ripe bananas: Naturally sweet and creamy; make sure they are firm enough to slice without turning mushy.
For the Pudding Layers:
- Instant vanilla pudding mix: Quick, easy, and sets perfectly in the fridge.
- Milk: To make the pudding.
For the Whipped Topping:
- Heavy cream or store-bought whipped topping: Adds lightness and creaminess.
For the Toppings:
- Chocolate syrup: The classic banana split drizzle.
- Strawberry or pineapple topping: Optional but adds the classic trifecta of flavors.
- Chopped nuts: Adds crunch.
- Maraschino cherries: The crowning touch.
This combination of ingredients recreates the full banana split experience in a layered cake that’s creamy, fruity, and indulgent.
Step-by-Step Instructions
Making a no-bake banana split cake is easier than it looks. Follow these steps to achieve a cake that’s layered, creamy, and visually stunning.
Step 1: Prepare the Base
Crush the graham crackers or vanilla wafers into fine crumbs. Melt butter and combine with the crumbs until it holds together. Press this mixture firmly into the bottom of a 9×13-inch pan to create the base. Chill in the refrigerator for about 10 minutes to set.
Step 2: Slice the Bananas
Peel and slice the bananas into thin rounds. Arrange them evenly over the chilled crust. This layer will provide the natural sweetness and creamy texture essential to a banana split.
Step 3: Prepare the Pudding
In a medium bowl, whisk together instant pudding mix and milk according to package instructions. Allow the pudding to set for a few minutes until thickened. Spread half of the pudding over the banana layer.
Step 4: Add Whipped Cream
Spread a layer of whipped cream or topping over the pudding. This layer adds lightness and contrast to the denser pudding.
Step 5: Repeat Layers
If desired, repeat the banana, pudding, and whipped cream layers for added height and indulgence.
Step 6: Add Toppings
Drizzle chocolate syrup over the top. Add strawberry or pineapple topping, if using. Sprinkle chopped nuts and place maraschino cherries strategically.
Step 7: Chill
Refrigerate the cake for at least 2–3 hours, or overnight if possible. This allows the layers to set and the flavors to meld beautifully.
Step 8: Serve
Slice and serve cold. Each slice should reveal layers of banana, creamy pudding, and fluffy whipped topping — the perfect no-bake banana split experience.
Tips for Perfect No-Bake Banana Split Cake
- Choose firm, ripe bananas: Overripe bananas can become mushy and affect the texture.
- Prevent browning: Lightly brush banana slices with lemon juice to prevent discoloration.
- Use chilled ingredients: Cold pudding and whipped cream help layers stay stable.
- Layer carefully: Spread pudding and whipped cream gently to maintain clean layers.
- Refrigerate long enough: Chilling is crucial for the cake to hold its shape and flavor.
Variations to Make It Your Own
No-bake banana split cake is versatile and can be customized to suit your tastes:
- Chocolate lovers: Mix cocoa into the pudding for a chocolate banana split twist.
- Tropical twist: Add shredded coconut or pineapple chunks between layers.
- Nutty version: Incorporate chopped walnuts or pecans into the crust or as a topping.
- Mini cakes: Make individual servings in jars or ramekins for parties.
- Boozy version: Add a splash of rum or banana liqueur to the pudding for adults.
These variations allow you to personalize the dessert while keeping the classic banana split flavor profile intact.
The Science Behind No-Bake Layered Desserts
Why does this cake work so well? Understanding the science helps ensure success:
- Pudding thickens via starch gelatinization: The cornstarch in instant pudding absorbs liquid and swells, creating a firm, creamy layer that supports the bananas and whipped cream.
- Chilling helps layers set: Refrigeration solidifies the crust and pudding, preventing sogginess.
- Acid prevents browning: Lemon juice on bananas slows enzymatic browning.
- Fat adds stability: Butter in the crust and fat in the whipped cream contribute to structure and richness.
With these principles in mind, your no-bake banana split cake will be stable, creamy, and visually appealing.
Serving Suggestions and Pairings
Banana split cake is versatile in presentation and pairing:
- Ice cream on the side: Vanilla or strawberry ice cream complements the pudding layers.
- Coffee or hot chocolate: The sweetness of the cake pairs beautifully with a warm beverage.
- Fresh fruit garnish: Additional bananas, berries, or even kiwi add freshness and color.
- Party platter: Slice into small squares for a finger-food dessert option.
Its creamy texture, layered flavors, and colorful toppings make it a showstopper dessert for any occasion.
Why This Cake Brings Big Cozy Energy
No-bake banana split cake isn’t just delicious; it embodies cozy, comforting vibes:
- Warm nostalgia: Evokes memories of childhood treats and ice cream parlors.
- Easy preparation: Minimal effort, maximum reward, perfect for home cooks.
- Rich textures: Creamy pudding, soft bananas, fluffy whipped cream, and crunchy crust.
- Visual appeal: Layers and toppings make it look festive without needing advanced skills.
It’s the perfect dessert for cold days, summer parties, or casual get-togethers.
Tips for Make-Ahead and Storage
- Make ahead: The cake can be assembled up to a day in advance and refrigerated. Flavors meld beautifully overnight.
- Storage: Keep covered in the fridge for up to 2–3 days.
- Banana freshness: For longer storage, brush bananas with lemon juice to slow browning.
- Freezing: Not recommended, as the texture may become watery after thawing.
Cultural and Culinary Context
Banana-based desserts are universally loved for their natural sweetness and creamy texture:
- Banana cream pie: A classic American dessert.
- Banoffee pie: British no-bake dessert with bananas and toffee.
- Foster desserts: Bananas caramelized in butter and sugar, originating in New Orleans.
No-bake banana split cake combines these ideas into a fun, modern twist that’s approachable for home cooks while celebrating classic flavors.
Final Thoughts
The No-Bake Banana Split Cake is the ultimate dessert for anyone seeking flavor, nostalgia, and convenience. With minimal ingredients and no oven required, it transforms a classic ice cream sundae into a creamy, layered cake that’s easy to serve and impresses every time.
Whether for a birthday, summer picnic, family gathering, or simple weekend indulgence, this cake delivers all the joy of a banana split with none of the stress of elaborate assembly.
By following the tips, variations, and tricks shared in this post, you’ll create a dessert that’s as beautiful as it is delicious — a perfect blend of comfort, sweetness, and big cozy energy.
